Tomahto, tomayto / pagoda, stupa

Regardless of whether they are graduates of MIT or merely the University of Life, Thais are a superstitious bunch. Many barbershops close on Wednesdays as local wisdom has it that a haircut in the middle of the week is as good an idea as shoving a fork into a power socket. Many, irrespective of sex, age, or class, wouldn’t dream of scheduling a caesarean or wedding reception without consulting a professional soothsayer. And just about every other building — be it a simple hovel out in the boondocks or a glittering skyscraper smack bang in the city centre — has a shrine for its guardian spirit, whom you’re supposed to pay homage to every now and again (red fantas being the preferred offering, though in some cases cheroots will also do).

A CIVIL SERVANT IN BURMA (1913): “The country is full of pagodas, monasteries, theins, images of the Buddha, zayats.” © IWM SE 1019

And then there are amulets. Believed to imbue their wearers with divine protection, mention of these talismans is almost de rigueur in Thai veterans’ accounts of WWII and the Cold War. Such is their popularity that one mall on the outskirts of Bangkok even has entire floors dedicated solely to shops specialising in charms. And if that isn’t proof enough, there’s also the fact that one of the country’s most-read dailies has a dedicated column in lieu of a theatre section.

PEEPS AT MANY LANDS, BURMA (1908): Not only on the river-banks do these pagodas crown the hills, but in every town and village throughout the country; and in many remote districts, far from present habitations, some shrine, however simple, has been raised.

That amulets are so widely collected is nothing but a blessing for wargamers, as without them we’d never have readymade stupas available on Lazada for as cheap as £3 a piece. Made of acrylic plastic and a hollow core designed for the placement of amulets, these storage cases are Thai in style, though with a bit of a squint they’d pass muster as Burmese or Laotian fanes.

Stupas galore: a diorama depicting 17th Century Siam at the National Museum in Bangkok.

Unlike the Angkorean ruins or giant Buddhas so beloved of many a gaming table, stupas are ubiquitous throughout Theravada Southeast Asia in both rural and urban settings. They feature not only quite heavily in accounts of the Burma campaign (though they are invariably referred to as pagodas), but also on French unit badges and recruitment posters. Which is all the weirder that most wargamers appear not to have picked up on their existence, as in all my years of lurking on the internet I’ve only ever seen one modelled for the tabletop.

For the smallest stupas, I drew inspiration from the trio of whitewashed stupas that mark the Three Pagodas Pass — a defile in the Tenasserim mountains straddling the Thai-Myanmar border renowned for its role in the Burmese-Siamese wars that raged intermittently throughout the four centuries that preceded the slow-motion demise of the Konbaung Empire at the hands of the British — and had them grouped in a triangle, reckoning it a livelier configuration than a straight-laced row. They were undercoated in VPA Dark Rubber and drybrushed with successive coats of VMC Light Grey and VGC Dead White.

Measuring a staggering 140mm tall, the largest of the bunch has been given an attention-grabbing coat of VGC Glorious Gold washed with Army Painter Strong Tone ink to represent the numerous gilded stupas that abound throughout the region, particularly in Myanmar. The plinth is a 3d-printed design downloaded off Thingiverse and was touched up using the same choice of colours as that of the smallest models featured above.

The M-sized stupa sports an inverted combination of the preceding specimen, with the gilding being confined to the structure’s tip. The pedestal is the same as the largest stupa’s ; if memory serves me right, it was actually designed to base a Dr Who sculpture.

The sheer ubiquity of these monuments means you can plop them anywhere on the table and they would neither look out of place nor unrealistic. If you think the above scene improbable, just look up the Sule Pagoda in Yangon or the That Dam Stupa in Vientiane.

And finally, a size comparison picture with 20mm Thais from Elhiem Figures in the foreground. As per the overlong introduction, the models are available from a number of sellers on Lazada, the Alibaba-owned, Southeast Asian version of Amazon. Give them a try!

Bullock train

Motorisation was but a pipe dream for most WWII armies, including Hitler’s, but where the Thais differed was their heavy reliance on bovine forms of transport for the ferrying of supplies. The invasions of Indochina and north-eastern Burma were sustained by long columns of bullock carts and pack oxen; mules on the other hand appeared to have only been used for battalion infantry guns while elephants were a rarity despite their prominence in the logging industry.

The water buffaloes pictured here are from Platoon 20’s Vietnam range and were given succeeding coats of VMC Black, VMC German Grey, and a 2:1 mix of VMC German Grey and VMC London Grey. The intricately sculpted pack loads — one of which features a Vickers machinegun, which thankfully was part of the Thais’ inventory — are also Platoon 20 and can be found in their otherwise horrid Chindits range.

In a moment of absentmindedness I’d glued the horns on backwards and didn’t realise the mistake until the figurines had all been fully basecoated. Clearly I don’t get out into the country much! I may yet call upon the intervention of some acetone if this reminder of human frailty gets too irksome.

The drivers (or whatever the bullock equivalent of muleteers are) are by Elhiem and Early War Miniatures and were painted using my usual triad of VMC US Olive Drab, VGC Caliban Green, and VMC Russian Uniform.

Right then, on to the next set of four-legged beasts: horses!

Vichy mountain artillery

Though none of the French artillery units featured in Nowfel Leulliot’s venerable map of the Franco-Thai War (itself based on a situation report housed in the French army archives) are described as possessing any of these, Claude Hesse d’Alzon’s indispensable La presence militaire francaise en Indochine does list the 65mm Mle 1906 in its inventory of the Indochina garrison’s arsenal.

And as if that wasn’t enough, thanks to the ATF40 forum we also have photographic proof of their presence in the colony. Borne by Peugeut pickups, the guns pictured are posited by one poster to belong to the 4e Régiment d’Artillerie Coloniale, a formation stationed in Tonkin.

The guns are SHQ and, unusually for this hallowed brand, were mastered by David Reasoner, the wargaming world’s leading expert on the KNIL. And very good they are too, though one of the wheels was marred by a broken spoke. I have omitted one fiddly bit I think is the gunsight as I had already had one too many superglue debacles that day. The crews comprise the usual suspects from Elhiem Figures.

Vichy heavy weapons

As the horse limbers to the Thai guns promised in my last post were proving to be so much of a chore that they threatened to obliterate my painting mojo, I instead devoted the past weekend to providing my long neglected French collection with some heavy weapons support using the crew packs from Elhiem Figures.

First up is a 25mm anti-tank gun. Made by Shellhole Scenics, it was an absolute delight to put together, being not just flash-free but also beautifully designed.

Purists will note that the paint scheme’s combination of Flat Earth, Bronze Green, and Tan Yellow (all Vallejo and copied from the Flames of War guide) is pure fantasy as the only hardware that appear to have sported a camouflage pattern in Vichy Indochina were the Panhard armoured cars and Citroen-Kegresse halftracks.

The unsurprising shortfall of modern weaponry in Indochina meant that many of the infantry battalions had to make do with the 37mm trench gun of Great War vintage, which more than twice outnumbered the Hotchkiss anti-tank guns available to the colony. Mine are by Early War Miniatures.

And lastly, a pair of Hotchkiss machine guns together with a helpful observer, all courtesy of Elhiem Figures.

Thai heavy artillery

The second unit to be completed as part of the week’s Big Push, this heavy artillery battalion (in Rapid Fire! terms, that is) stands ready to support the trudge up Indochina’s Route Coloniale 1 towards the elusive objective of Sisophon.

That I was able to churn these out in record time has much to do with the fact that the crew figures were actually painted nearly a decade ago, leaving only the observers to be done.

The guns are from Shellhole Scenics‘ Hungarian range, and like all of that maker’s products they are beautifully cast. Unfortunately they were a bit fiddly to assemble and, in the untrained hands of one such as myself, the end result is a slanted wobbliness that’s utterly unseemly of these behemoths.

The gunners are by Elhiem Figures and the clutter of shells and crates mainly Raventhorpe’s. For my own reference, the latter were basecoated in VMC Olive Grey, washed with Army Painter Dark Tone, and successively layered with VMC Olive Green and a 1:1 mix of VMC Olive Grey and VMC Flat Yellow.

Standing in for the Landsverk artillery tractor is the Japanese Type 98 “Shi-Ke”, which of course looks nothing like its Swedish counterpart. The tractor is from S&S Models and was a complete disappointment to behold. Design-wise it’s comparable to a Frontline Wargaming kit, which is to say it’s simple and workman-like. But unlike the average Frontline Wargaming product, the model is horribly moulded, with a good number of air bubbles and what seemed to me like unremovable flash, giving its £8.50 price tag the sheen of daylight robbery.

The helmeted observer is a Polish cavalryman from SHQ while his diminutive pal hails from that company’s early war Wehrmacht range. Hardly suitable as Thais, but then again no one’s going to notice at arm’s length.

To whisk the duo around is a diecast Vauxhall VX10 (a “pre-war version with vertical grille” according to the box) by Pocketbond repainted in VMC Olive Grey, the same colour as the guns and tractor. The license plate has been omitted pending the release of Black Lion Decal’s Thai army set.

Interestingly enough, the 105mm Bofors doesn’t appear to have been restricted to just heavy artillery battalions. Two firsthand accounts of the Japanese invasion — one an after-action report by a battalion commander at Nakhon Si Thammarat and the other a memoir penned half a century after the event by a battery commander at Songkhla — describe their battalions as having a battery of these alongside their regular 75mm calibre guns.

In photographing these I have attempted to pay homage to scratchbuilder extraordinaire and fellow Rapid Fire! enthusiast João Pedro Peixoto, whose bucolic backdrops to his prolific output I have long admired.

Next up: horse artillery!

Thai six tonners

The first proper plastic kits I ever built, these had been sitting primed and ready for painting since June, the month I stopped working from home.

The Vickers Mark E Type B is arguably the tank most associated with the Thai army of WWII, never mind the fact that it was outnumbered by the Ha-Go. That this is the case is likely a result of people knowing only of the Franco-Thai War — during which the six tonners famously saw action against the Foreign Legion, whose erroneous claim of having destroyed three of the tanks has been repeated ad verbatim all over — and not the rest of Thailand’s participation in the wider world war, which was when the Japanese-made tanks were put into the field.

Unusually for a tank whose commercial success resulted in its showing up in locales as far flung as South America and the Balkans, in 20mm there are only two makes to choose from. The first is a four-piece resin casting from Frontline Wargaming, a firm that manages the impossible feat of providing decent, wargamer-friendly wares at economy prices. At the other extreme there’s the plastic injection kit from Mirage Hobby of Poland which is more aimed at serious hobbyists who get off on tackling complex builds.

Wanting an open hatch, I went against instinct and opted for the Mirage kit. While I cannot claim to have cherished the assembly of 132 individual wheels from double that amount of pieces, it was a straightforward enough build.

The painting is what you would expect of a simpleton such as myself, consisting of a base of VMC Olive Grey, a wash of dark brown (more on that in a minute), and a drybrush of a 1:1 mix of Desert Yellow and Olive Grey. No pigments or filters for the likes of me!

Time for a quick plug: I cannot recommend Tamiya’s line of enamel-based washes enough. I know it’s the modelling equivalent of preferring Heineken over a double IPA from deepest darkest Congo, but I think these are superior to the MIG stuff everyone and their nan have been hollering praise for. They are certainly easier to use, being adorned with tiny, built-in brushes that are perfect for pin washes.

The commander figure is actually a Lancer Miniatures French crewman whose head has been replaced with that of an American tanker from Raventhorpe. His overalls was painted in the standard scheme I use for my Thais while the goggles received a base of VMC London Grey followed by a second coat of VMC Sky Grey, with VMC Azure being employed for the glass.

I shall definitely be revisiting these sometime after the new year, once Black Lion releases their set of Thai army decals.

Next up in my rearmament programme: howitzers!

Traditional Thai house

Sarissa Precision’s Far East huts are all the rage these days, but while they may be well and good for semi-isolated jungle dwellings in the middle of nowhere, I wanted something a little more refined and affluent, the sort of well-off housing you’d expect of a market settlement laying astride a trunk road leading to somewhere.

This wasn’t as tall an order as you would think. As it turned out, there are certain benefits to living where I am, even if a jar of Branston Pickle does cost thrice as it would in Blighty: safety from the pandemic’s worst ravages (with the death toll currently standing at 61) and, more pertinently, a thriving cottage industry specialising in miniature houses that cater to doll collectors and spirit worshipers(!).

I had initially intended on getting custom-built structures that would only require a paint job to bling things up. But incredibly enough, none of the many makers I contacted had any opening in their commission queues. Which meant turning to kit manufacturers.

My first port of call was Art-Dee, a one-man band (aren’t they all?) from whom I had previously sourced a train station. But despite my entreaties, the proprietor saw no point in scaling down his line of easy-build houses, which, being 1/50 scale, are more suited to 28mm.

That left Traditional Thai House Model, whose simplest kit consists of close to two hundred laser cut pieces.

With prices upwards from £34.50 they are by no means cheap, but in addition to the uniqueness factor (always great for rationalising a purchase!), there’s also the fact that the kits are made of actual teakwood. In other words, the mithril of wood, prized for its durability and imperviousness to termites. And as anyone who has tried to procure teak furniture will let you know, this material will cost you an inheritance. Now whether that justifies the kits’ price tags is debatable, but it’s not like one is spoilt for choice…

Equally debatable is the quality of the instruction sheet. Personally I would have sworn a lot less had the individual steps been broken down further as I repeatedly discovered that some pieces would have fitted more snugly had it been made clearer that another combination ought to have preceded their positioning. Combined with the multitude of pieces, this was nothing short of an arduous build, the model house equivalent of religious self-flagellation or those fiddly resin AFVs produced by obscure European brands. That being said, the result is nevertheless well worth the effort.

The assembly having greatly tested my patience, I could not wait to move on to other projects and so opted for a simple paint scheme using Tamiya’s Dull Red spray, a near-match for the “barn red” employed by the Jim Thompson House in Bangkok. This was followed by a quick wash of Army Painter’s Dark Tone, topped with a generous drybrush of a light sandy colour whose identity I have forgotten.

Basing was a similarly simple affair. A piece of hobby foamboard weighed down by washers that also helped make up for the uneven stilts (damn the instructions!) was cut to size, bevelled, and textured before undergoing a base coat of Tamiya JGSDF Brown and a drybrush of VGC Bonewhite.

Livening things up is a pair of water jars which I have placed out in the open, by the staircase. Though today’s pollution has made their function decorative, “back in the day” these earthenware jars were used to collect rainwater from which one could either drink or shower.

For pots there is an anonymous Chinese line of architectural accessories readily available on ebay and AliExpress. These are neither cheap nor spectacular, requiring some effort to touch them up. Well, a lot of effort actually, as what I had in mind are dragon motifs not unlike the ones below.

But as luck would have it, Traditional Thai House Models unexpectedly released exactly what I needed while my ebay order was slowly making its way from Shenzhen. Clearly targeting railway modellers, they come pre-painted and are of a dragon-bearing design ubiquitous to landed properties in Thailand.

In the end I decided on making use of the aforementioned goodies I had ordered from China to add an extra dash of colour to the house. Thus began my first and near-disastrous attempt at Ming pottery: a basecoat of VMC London Grey followed by drybrushed highlights of VMC Sky Grey and VMC Cold White. For the pattern — intended to portray a never-ending tree branch but which instead ended up vaguely suggesting mythological beasts (at least to my charitable eye) — an unshaken bottle of VMC Dark Blue was relied upon. Unshaken being the operative word, as it’s the watery thinness we would otherwise curse that’s key to a passable mimicry of blue and white porcelain.

As a finishing touch, a flowery tuft from another local firm, GG Diorama, was added to the vase in imitation of the amazing work done by The Tactical Painter.

Originally meant to house a clothesline, the corner patch in the back was requisitioned for banana trees that Traditional Thai House Models had gifted me in recompense for a misplaced order. Though they are much too flimsy to last long on a tabletop battlefield, the inclusion of fruits on some of the trees was too good of a thing to shelve.

A quick word on usage: as each of the six countries that make up mainland Southeast Asia has its own distinctive style of architecture, versatile this building isn’t. Using it for games set in Burma, Malaya, or Vietnam would be akin to plopping a Russian orthodox church into the middle of Oosterbeek. Or populating a Normandy board with Mediterranean houses for that matter. Thankfully there’s much of an overlap between the Thai and Cambodian vernaculars, so that’s me sorted out.

And last but not least, some propaganda shots featuring some Elhiem Thais.

So there you have it, the beginnings of a village. That is, if I can work up the courage to put together the three other kits awaiting my attention.

Garde Indigène

Anyone looking to game a Vichy Indochina force would do well to procure a contingent of garde indigène, a paramilitary police force wholly under the control of the governor-general’s office which one colonial administrator credited with the following achievement:

from the earliest times of the French occupation has rendered the greatest services, and one could say that, if the conquest proper was the work of the regular army, it is to the Garde indigène that the credit is due for the internal pacification of the region and the definitive collapse of the armed bands that, for almost twenty years after the peace treaties were signed, still ravaged numerous regions.

While colonial gamers may be hard-pressed to find a place for them in the 19th Century campaigns that are fast gaining currency in 28mm, the garde did occasionally play a frontline role in the Franco-Thai War, with varying levels of success. 

For a gendarmerie trained to hunt dacoits and put down the odd peasant rising, they did surprisingly well in the face of artillery and machine gun fire at Samraong in northwestern Cambodia, where they managed to beat back an attack by two Thai battalions (it helped of course that the fort the garde were holding boasted unobstructed fields of fire in all directions).

On the other hand, the threat of a bayonet charge by a mere platoon of Thai infantrymen was enough to scare the entire garde indigène garrison at Vang Tao in southern Laos into abandoning its defence of that particular village, thereby allowing the invaders to rapidly funnel their main force through the nearby mountain pass into open country.

Not that you’d be restricted to manning static defences. The garde very likely ran into detachments of its counterpart, the Thai field police, while on patrol during the skirmish phase of the war, so there’s the potential for gaming meeting engagements. For the more offensive-minded there’s a riverine assault on an island in the middle of the Mekong that the garde is said to have participated in.

As per the rest of my Vichy troops, I used Foundry Boneyard A followed by a highlight of Foundry Boneyard B for the uniform. The berets were provided a basecoat of Vallejo Game Colour Night Blue and highlighted with a 1:1 mix of VGC Imperial Blue and Vallejo Model Colour Flat Blue — just because none of the 8 Vallejo blues I own worked! 

For a dash of élan I gave two of the figures red sashes (VGC Scarlett highlighted with VMC Flat Red) in the fashion of the tirailleur regiments, a parade ground look evidenced in a 1941 photograph taken at Battambang.

I was inspired by the smashing painting guide put out by 1898 Miniatures to try a mix of VMC Beige Brown and VMC Flat Flesh. Curiously enough the resulting shade was hardly any different from the VMC Cork Brown I had used on my tirailleurs cambodgiens!

A quick note on the figures: they are by Elhiem, whose casting quality is second to none. Very faint mould lines to smooth over and practically next to no flash meant that these very quickly made their way to the painting table, while their lack of accoutrements (appropriate for a force with little capacity for mobility) ensured that they got off it equally quick.

Vichy armour for Indochina

Like many others, I was spurred by the recent anniversary of Fall Gelb to put together a  number of French AFVs for 1940. Except, of course, these won’t be facing Stukas and panzers. As if the title wasn’t enough of a hint!

First up is the only tank to have seen service in the colony pre-1945, the venerable FT17. This particular beast was actually begun in 2015 and was retrieved from the drawer of half-finished models with its original basecoat of Vallejo Golden Olive, Buff, and Flat Earth (more on the scheme later) more or less intact. A quick build kit from Early War Miniatures, I remember it being an absolute delight to put together thanks to the excellent mould quality. 

The FT17s fielded in Indochina were painted a boring plain green, but this was information I did not find out till the publication of issues 116 and 117 of GBM Magazine a year after I had commenced work on my tanks. The sources I had at the time, sparse as they were, suggested quite the opposite: a 1938 newsreel footage taken in the French concession of Hankou, for example, provided me a perfectly reasonable excuse to go for something substantively more colourful (bearing also in mind that the tanks stationed in China apparently ended up being transferred to Indochina, albeit after the war with the Thais). Hence the camo, which is of Great War vintage for the simple reason that I copied it off the box cover art of a Takom kit.

This second FT17 is a plastic First to Fight kit and sports a two-tone scheme based on a profile of the tank in the lavishly illustrated 5ème Etranger: Historique du régiment du Tonkin. Being 1/72 it is a tad larger than its EWM counterpart, though this size difference is surprisingly negligible even when viewed close up. Note to self: the tracks started with a basecoat of Vallejo Black and was followed by successive drybrushes of London Grey, German Grey, London Grey, and US Tankcrew Highlight.

One reason why the FT17s were shelved midway through painting was the 20mm market’s distinct lack of appropriate kits to flesh out the rest of the unit. For a colony so under-armoured it’s quite bewildering how unique many of the vehicles it was allotted were. One was an upgunned modification of the ubiquitous Renault UE “chenilette”, a running example of which is kept at the Thai cavalry museum. Although wargamer-friendly versions of the standard carrier are available from three different 20mm makers, any one of which would have adequately served as the basis for a conversion, I did not possess the mad skills of João Pedro Peixoto to scratchbuild an entirely new casemate.

Then 2019 came along and out came a new release from Chinese company S-Model, which I readily snapped up once it appeared on ebay. And like waiting for the bus, six months later another model was put out by Early War Miniatures. C’est la guerre, as they say.

DSC_0789

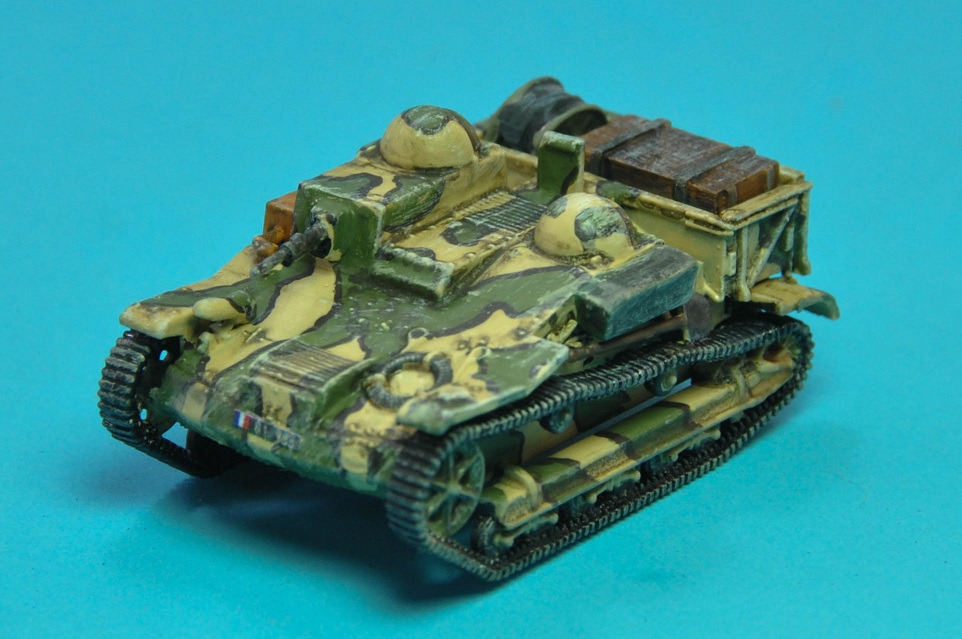
The chenilette comes two to a box and were a bit fiddly to build, with the machine gun’s fragility requiring extra care in severing it from the sprue. Being based on the version exported to China the cupola is incorrect for French usage unless internet reports that a few were confiscated by the Indochina government are to believed. So rather than follow the colours suggested in the aforementioned GBM issue, I opted instead for the one provided to the Chinese, which I shamelessly copied from a scale modeller. Like the rest of the vehicles featured in the post, the green was derived from a 1:1 mix of Tamiya Yellow Green and Tamiya Olive Green. A colour very much similar to that used by my references, though in hindsight I should have used Tamiya Nato Green for a greener hue.

DSC_0793

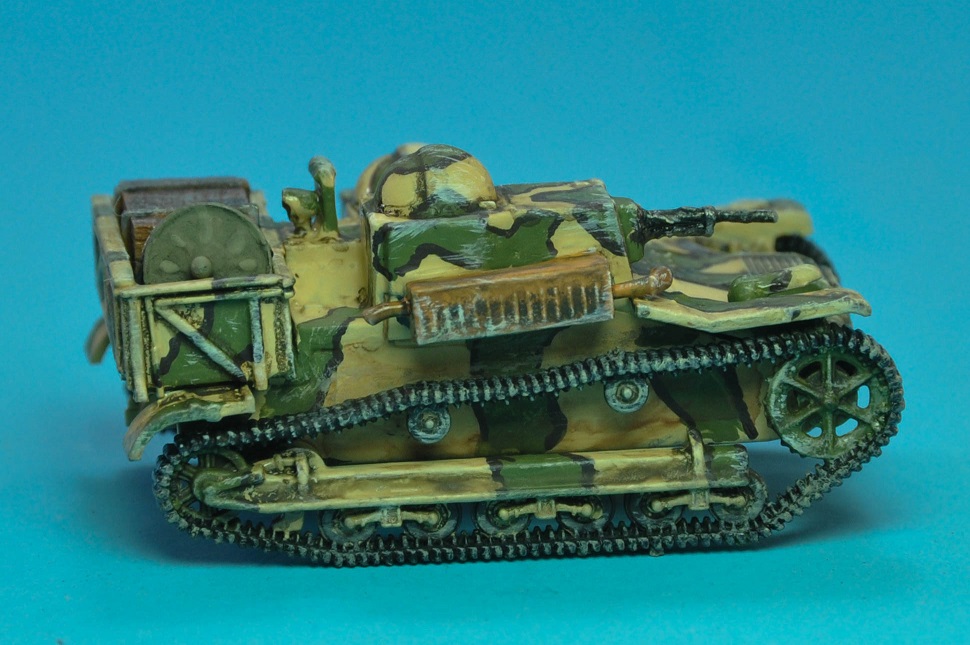
To bring out the rivets and panel lines I relied on AK Interactive’s Afrika Korps wash. Yet another poor choice given the small size of the vehicle, one that overly accentuated the darkening effect of the Vallejo German Camo Black Brown I had used to outline the stripes. To offset this disaster I took a leaf out of Just Needs Varnish John’s notebook by drybrushing the entire vehicle with Vallejo Buff. This in turn created more problems than it solved, lending the UE an off-putting greyness that convinced me to forgo this last drybrush on the other vehicles seen here. Drybrushing skills I clearly have not.

The next vehicle is one specific to Indochina, namely the “Colonies” version of the famous Panhard armoured car. While a conversion kit is available from French cottage firm Minitracks, I was gripped by a sense of adventure and determined instead to sample a 3d-printed model from Shapeways on the strength of their repeated appearance on Just Needs Varnish.

And what a choice it was! Whatever doubts I had about the technology evaporated the very instant I unpacked my parcel. The model required neither clean-up nor assembly, and is made of a very nice material that feels sturdy to hold.

DSC_0775

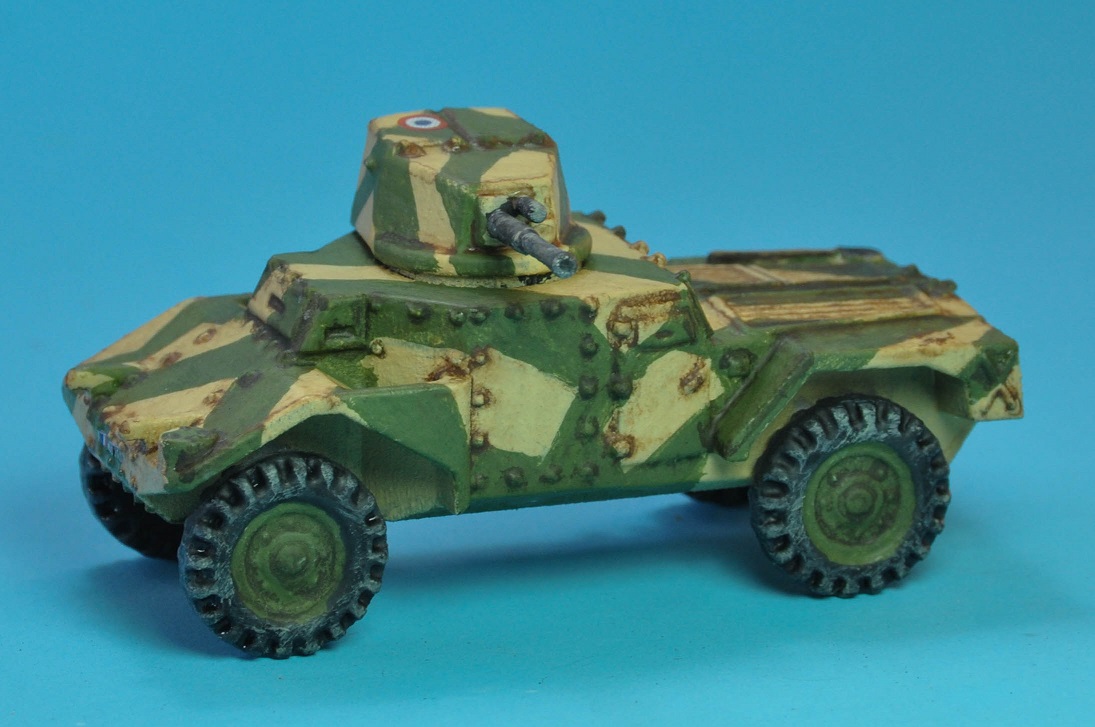
The camouflage pattern was provided by a modeller’s sterling Franco-Thai War diorama in 1/35 scale. This is very much a variation on the colour profile available in Trackstory no.14 and recycled in issue 117 of GBM Magazine, itself conjectural in the sense that it is based on turretless vehicles captured by the Germans. But conjectural was good enough for me as the angular scheme differed nicely with the usual Gallic aesthetic one usually sees on French AFVs.

The defenders of Indochina also had access to the Citroen Kegresse P104, an utterly wonderful oddity of the interwar era that provided a wonderful relief from the usual green-and-tan which you, dear reader, will have become accustomed to by now.

DSC_0786

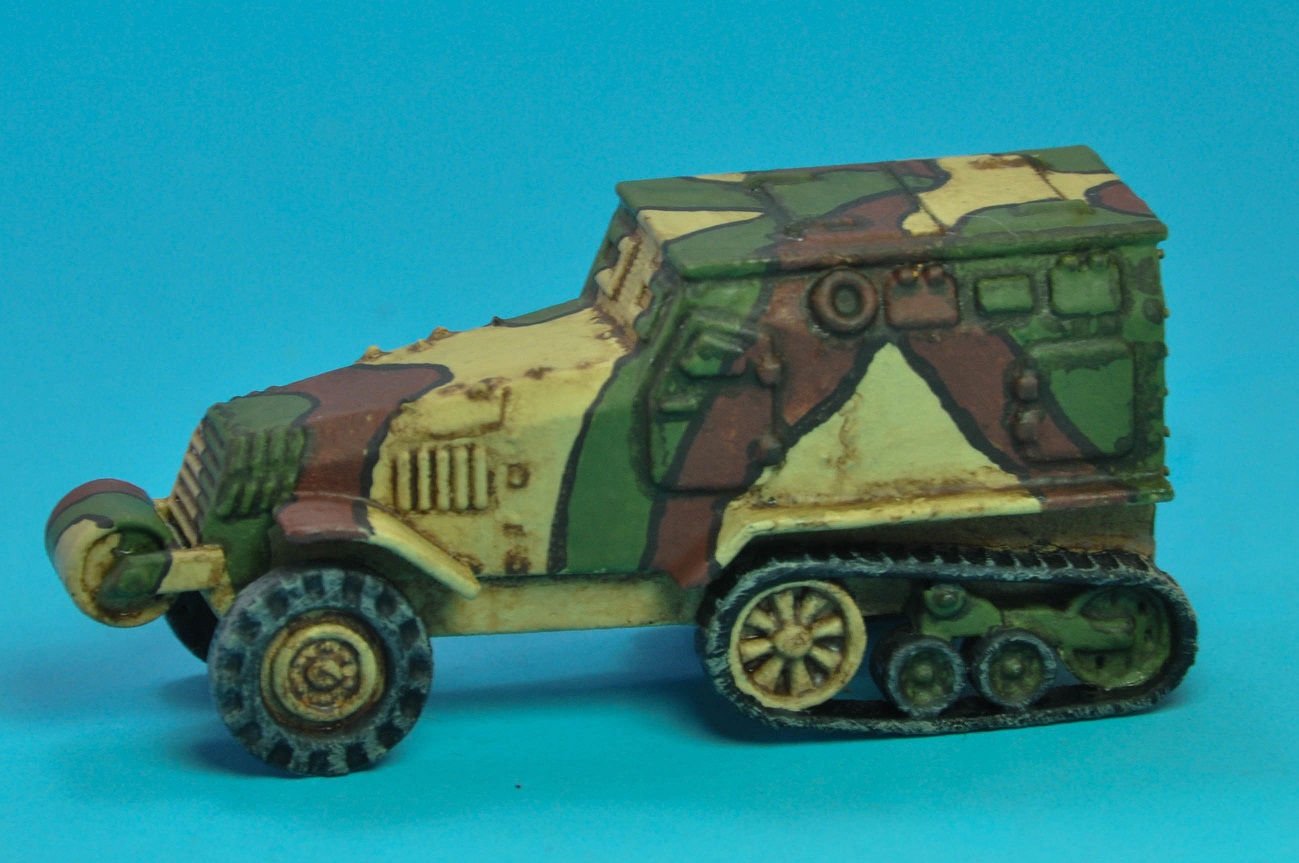
I did for a brief moment consider procuring the model Retrokit released in early 2019, but the prospect of sawing thin, delicate fenders off chunks of thick resin evoked feelings of Lovecraftian dread that very quickly disabused me of the notion. It was at this point that Just Needs Varnish John, kind man that he is, stepped in to alert me of the halftrack’s availability on Shapeways.

DSC_0788

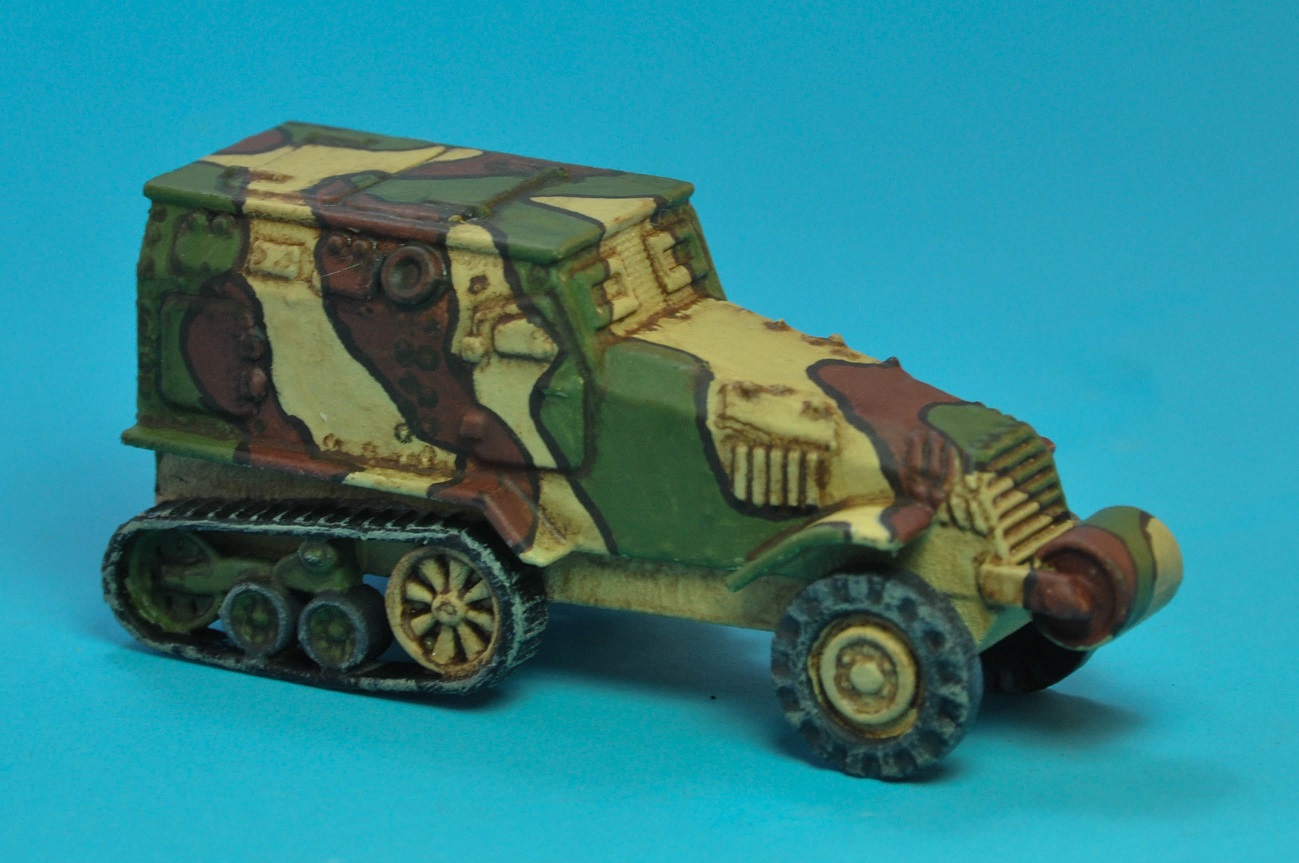
A lovely one-piece print it is too. In painting the model I drew inspiration from two sources, namely the cover of Trackstory no. 12 and a scratchbuilt 1/72 model — the eagle-eyed among you will have noticed that both depict the turreted version that patrolled Equatorial Africa. Colours employed were Vallejo Buff, an equal mix of Tamiya Yellow Green and Olive Green, and Vallejo Mahogany Brown. The wheels were basecoated with Vallejo Dark Rubber, washed with Army Painter Dark Tone, and drybrushed with Vallejo US Tank Crew Highlight. And yes, the rear wheels should have been black, but certain concessions to coolness needed to be made.

Finally, there’s the White Laffly AM50 which the motorised detachments of Indochina were amply supplied with. A charming but antiquated WWI design that was outclassed by every other armoured fighting vehicle in Europe but which was good enough for putting down peasant uprisings.

DSC_0783

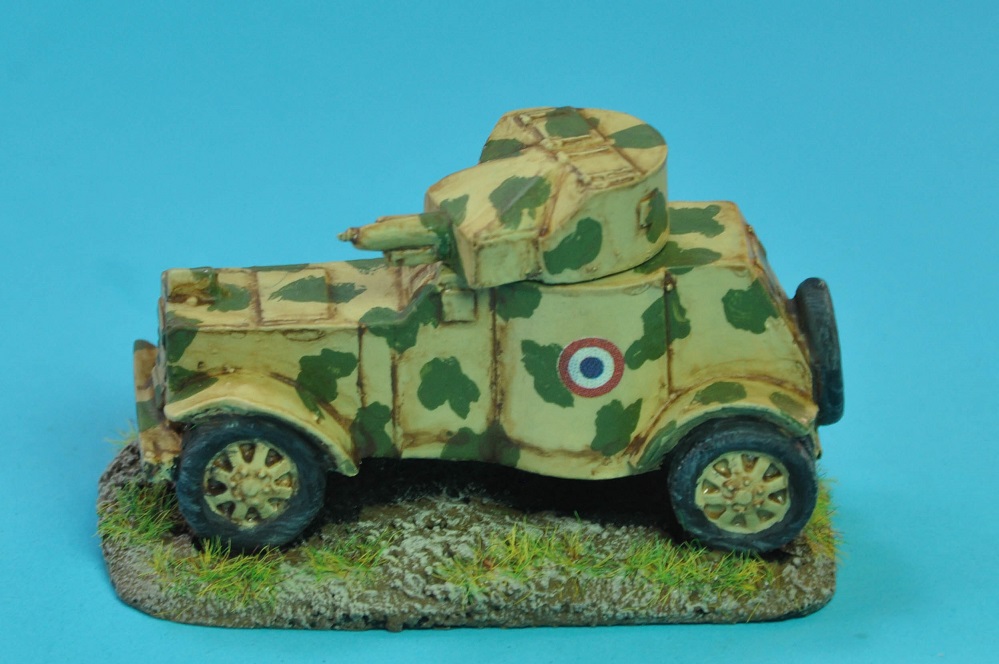
For a vehicle that saw such extended service throughout the French empire it is pretty shocking that the only 20mm model of this armoured car is a resin kit from Wespe. Having no advanced modelling skills I opted instead for the next best thing, which is the Laffly-White armoured car from the Raventhorpe Ready to Roll range available on the Rapid Fire! site. Unlike the rest of their output this particular three-piece kit is something of an enigma, more mimicry than replica, with its most otherworldly (i.e. inaccurate) feature being the turret.

DSC_0785

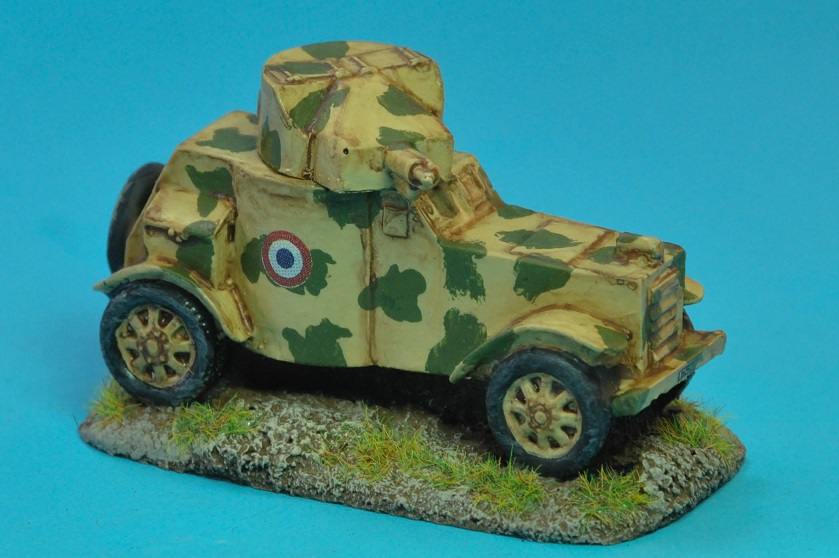
In this case the designer’s lax commitment to accuracy is mirrored by my own, for the Laffly Whites in Indochina were monochrome like that colony’s tanks. Needless to say, I found this despicably dull and so settled on a scheme more appropriate to the Sahara, copying yet another scale modeller who had been kind enough to figure out an appropriate scheme.

With the easing of lockdown restrictions it’s anyone’s guess whether I will be able to finish the softskins and motorcycles in a timely manner. But wish me luck!

Vichy Cambodians

Khmers constituted a portion of the units Vichy fielded in its defence of Cambodia, with one assessment of the campaign against the Thais singling them and the Montagnards of central Vietnam out for being the most reliable of Indochina’s native troops.

Whilst in reality these regulars would have been attired no differently from the rest of their French and Vietnamese brethrens, I wanted to infuse some of the exoticness most people associate with all things colonial into my Vichy battlegroup, so began hunting for pictures of what their parade ground look was.

Sadly, googling “tirailleurs cambodgiens” only brings up the same pre-WWI, fin-de-siecle photographs of barefooted men. Clearly I needed a different search term.

Now, anyone who knows their Southeast Asian history will know that the birth roots of modern Cambodia are to be found in the immediate aftermath of the Franco-Thai War, when the Vichyite governor-general in Hanoi handpicked the teenage Prince Norodom Sihanouk to succeed his grandfather Sisowath Monivong – who, interestingly enough, was so miffed at the ceding of his realm’s most prosperous and productive provinces to the Thais that he thereafter refused meeting anyone French – over the heir presumptive, who the French thought a much less pliable character (oh how wrong they were!).

Which meant that a search for images of the two Cambodian royal ceremonies of 1941 was in order. And boy, was my hunch right.

Google’s limited results pointed in the lone direction of Kampot la prospère, a wonderful repository of Cambodia’s pre-revolutionary past. In the entry on Sihanouk’s coronation we get this excellent view of the troops lining the procession path:

Sihanouk coronation parade

The men pictured are in ceremonial whites with puttees, sash, and beret of matching colour (possibly yellow, judging from the two extraordinary colour photographs of the garde royale‘ featured in a 1931 issue of National Geographic magazine). With the exception of the shoes, they look identical to those who had participated in the previous coronation parade some 13 years prior, as pictured below in a 1928 photograph belonging to the École française d’Extrême-Orient:

Monivong coronation parade

The blog entry on the cremation of King Monivong is even more useful, as it features soldiers in uniforms the Thais were more likely to have encountered on the battlefield:

Monivong cremation
The eagle-eyed will no doubt notice that whilst all are decked out in khaki drill, those furthest from the camera appear to be wearing berets of a different, much lighter hue than those in the foreground. Presumably they are yellow, the colour of the Royal Guard, as seen here in this National Geographic photograph from 1931:

natgeo1931_02

And the rest? Wishful thinking suggests they are army regulars from the Régiment de Tirailleurs Cambodgiens. And while it would not be unreasonable to assume that the berets these men sport are dark blue like those worn by Vietnamese tirailleurs serving in China and the mountainous regions of Annam,  I couldn’t quite swat away the image of these Lucotte toy soldiers my original googling for Cambodian tirailleurs had thrown up:

Elge Cambodians

A toy manufacturer’s flight of fancy, perhaps? Perhaps. But Peter Abbott’s incredibly useful Rivals of the Raj has this description (itself derived from Maurice Rives and Eric Deroo’s Les Lính tâp: Histoire des militaires indochinois au service de la France, 1859-1960) of Cambodians in French service at the turn of the century:

“The Tirailleurs Cambodgiens were given a remarkably western uniform reminiscent of the Chasseurs Alpins… [consisting of] a red beret… loose trousers by culottes cyclistes or wide, loose breeches coming down to just below the knee. These were worn with red puttees and bare feet. The beret bore no device.”

Thinking it not outside the realm of possibility that the red would be retained three decades on, I engaged in yet another wild goose chase, during the course of which I chanced upon pictures of an exhibition on Indochina which the Musée de l’Armée in Paris had held between 2013 and 2014. Among the exhibits was a 1931 painting by Marie Antoinette Boullard-Devé, an École des Beaux-Arts graduate who had travelled extensively across interwar Indochina:

Boullard-Devé-Indochinois-1931

Having found a perfectly good excuse to field some red berets for the Franco-Thai War, it was time to look for figures. I very quickly honed in on Minairons Miniatures’ Spanish Civil War offerings, whose wares were not only sculpted by “Xan” Bautista of Fantassin fame, but also have the extra benefit of having the look I needed – the webbing, for example, is of a pattern very similar to the French, being composed of a Y-strap and a back cartridge pouch of the right shape, while the machine guns are Hotchkisses. And as if that wasn’t enough, Minairons also does separate heads, including berets pulled to the left in the French manner. So here you have them:

DSCF2093

As you can see, the sculpting is nothing short of exquisite, making them a complete pain to paint. Flash was minimal, though rifle barrels and bayonet tips were unexpectedly brittle, something I found out the hard way.

DSCF2088

DSCF2089

These follow my standard recipe for Vichy colonials, with a basecoat of VGC Beasty Brown and a highlight of VMC Cork Brown being used for the flesh. Not as successful a sunburnt Asian skintone as I had hoped, but I’ll be sticking to it for the rest of the battalion.

DSCF2082

DSCF2090

The berets were each given a healthy dollop of Tamiya Quick Dry epoxy putty for that extra bit of floppiness, followed by a triad of VGC Black + VGC Scarlet Red – VGC Scarlet Red – VGC Bloody Red. The same colours were also used for the waist sashes.

DSCF2096

As you can see, my go-to varnish (Daler Rowney) has acted up, despite numerous attempts at shaking the bottle. Shall need to do something about the satin finish soon-ish…